Make Bird Seed Blocks at Home
We enjoy watching the birds all year long. In the winter we like to offer them some food and water to encourage them to stay near. Making bird seed blocks saves a little money, plus it's a fun family activity. You can customize them with flavorings like peanut butter or add nuts, dried fruits and fruit or vegetable peels. We use saved fat from cooking to make them more economical, and to reduce waste in our home. As always, use caution and common sense when using a heat source. This is how we make our own bird seed blocks:
Step 1- Render The Fat. Gather up any reserved solid fats. Mine were in the freezer. Put about an inch of water into a pan with a lid. Add the fats and warm the pot, covered, until all the fat is melted. Give everything a good stir to help any solids separate from the fat. Allow to cool until really cold - I left ours outside overnight in cold weather. Cut down through the fat to release the water, drain. Scrape the scum - there's really no other word that describes it better - off the bottom of the fat cake and discard. Now you have clean, rendered fat for your seed blocks.
Step 2 - Make The Mixture. Heat the fat until just melted - it doesn't need to get hot, just melted. Stir in whatever ingredients you've chosen from up above, starting with peanut butter and/or corn meal, if you're using those. Next, stir in items like bird seed, dried fruit, chopped orange rind, etc. If squirrels are a problem, you can mix in a little cayenne. It is supposed to deter them without really bothering the birds. Add ingredients until the mixture is fairly 'full' of stuff.
Step 3 - Mold The Mixture. You can line the molds with plastic wrap if you like - we decided not to. Spoon your block mixture into the mold and tamp it down until all voids are filled. (Apparently, I stopped taking photos. Sorry.)
Step 4 - Freeze The Mixture. Place your mold or molds into the freezer and freeze the seed blocks until completely solid.
Step 5 - Final Product. Tap your molds to release the seed blocks. If you didn't line the mold with plastic wrap, wrap each block in plastic wrap. Store in the freezer until you need them, and when you need one, simply unwrap it and put it into a feeding cage.
Enjoy the birds while they enjoy their seeds!
Note: You can also make seed blocks for your chickens with scratch grains, dried fruits and vegetables, etc. Coconut oil is a good, solid vegetable fat.
Step 1- Render The Fat. Gather up any reserved solid fats. Mine were in the freezer. Put about an inch of water into a pan with a lid. Add the fats and warm the pot, covered, until all the fat is melted. Give everything a good stir to help any solids separate from the fat. Allow to cool until really cold - I left ours outside overnight in cold weather. Cut down through the fat to release the water, drain. Scrape the scum - there's really no other word that describes it better - off the bottom of the fat cake and discard. Now you have clean, rendered fat for your seed blocks.
 |
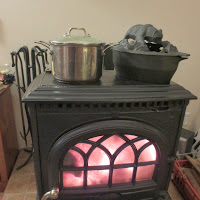
| I rendered the fat on the wood stove, since we were using it anyway. |
 |
| Once the fat was partially cooled, I poured it into containers so it could harden outside. The watery bottom part will be thrown away. |
 |
| The next morning. Someone was hungry? |
 |
| Kitty prints! Next time, I best put the containers in the shed. |
Step 2 - Make The Mixture. Heat the fat until just melted - it doesn't need to get hot, just melted. Stir in whatever ingredients you've chosen from up above, starting with peanut butter and/or corn meal, if you're using those. Next, stir in items like bird seed, dried fruit, chopped orange rind, etc. If squirrels are a problem, you can mix in a little cayenne. It is supposed to deter them without really bothering the birds. Add ingredients until the mixture is fairly 'full' of stuff.
 |
| This is some coarse ground wheat from an event we did at church on a Wednesday night. I let the kids mill some grain, but it had a lot of hands and such in it...so we'll feed it to the birds. |
 |
| Daughter is adding some bird seed. See those freezer containers to the right? They were our molds, and they worked great! |
 |
| This consistency is about right. By the time it's tapped into the mold, it has the slightest smooth surface of fat, and it holds together without crumbling. |
Step 3 - Mold The Mixture. You can line the molds with plastic wrap if you like - we decided not to. Spoon your block mixture into the mold and tamp it down until all voids are filled. (Apparently, I stopped taking photos. Sorry.)
Step 4 - Freeze The Mixture. Place your mold or molds into the freezer and freeze the seed blocks until completely solid.
Step 5 - Final Product. Tap your molds to release the seed blocks. If you didn't line the mold with plastic wrap, wrap each block in plastic wrap. Store in the freezer until you need them, and when you need one, simply unwrap it and put it into a feeding cage.
Enjoy the birds while they enjoy their seeds!
Note: You can also make seed blocks for your chickens with scratch grains, dried fruits and vegetables, etc. Coconut oil is a good, solid vegetable fat.

Comments
Please respond and Thank you.